
One of the vital irritating issues about working in Microsoft Phrase is coping with photos. They at all times appear to mess up the doc’s construction, are practically inconceivable to reposition, and infrequently behave inconsistently. That is why I’ve discovered a greater solution to deal with pictures in Microsoft Phrase.
Working With Footage in Phrase Can Be a Problem
In the beginning, Microsoft Phrase is a textual content editor and doc creation program, not publishing software program. For that reason, it prioritizes coping with textual content forward of coping with photos, which is why, in spite of everything these years, Microsoft Phrase boards are nonetheless clogged with folks complaining about the way it handles photographs.
Plenty of respondents in these boards typically say that you would be able to right-click a picture, and select from the Wrap Textual content choices.

Though that is, certainly, one solution to make photos barely extra obedient, it is unclear what every possibility truly means, and this system nonetheless manages to glitch each infrequently.
What’s extra, even in case you do grasp the text-wrapping properties, you may in all probability nonetheless come upon different difficulties once you dare to maneuver or resize the picture. And the instruments (and their effectiveness) can differ in older variations of this system.
The Reply to All My Image Issues: Invisible Tables
In comparison with coping with photos, working with tables in Microsoft Phrase is a breeze. They transfer simply, you’ll be able to resize them to suit the width of the web page, and you may change the desk’s paragraph settings in order that they behave reliably and precisely as you need. Additionally, tables keep in place relative to the textual content, so you’ll be able to relaxation assured that they will not soar round as you edit your work.
That is why I at all times place my pictures inside tables in Microsoft Phrase—and after I’m executed, I merely take away the desk’s borders.
First, place your cursor the place you need the picture to go. Then, within the Insert tab on the ribbon, click on “Desk,” and select a 1 x 1 construction.

Associated
The Best Tips for Creating and Using Tables in Microsoft Word
Do not get annoyed by Phrase’s notorious tables!
Now, together with your single-row-single-column desk added, and the cursor positioned inside, click on “Footage” within the Insert tab on the ribbon, and find and insert your picture.

Now that the image is inserted inside a desk cell, there are a number of steps to take to customise the way it appears and behaves.

Add Spacing After the Image
Within the instance above, there is not a niche between the underside of the picture and the subsequent line of textual content, so that is the very first thing that must be addressed to enhance the way it appears. To do that, hover your cursor over the desk, and click on the crosshairs button that seems within the top-left nook to pick out the entire desk and its contents. Then, within the House tab on the ribbon, click on the “Paragraph Settings” dialog field launcher.
Now, within the Indents And Spacing tab of the Paragraph dialog field, match the Spacing After measurement with the font dimension used in your doc’s physique textual content. Doing this helps make sure the spacing between the photographs and every paragraph is constant. In my case, my regular type textual content is 11 pt, so that is what I am going to sort into the Spacing After area. Then, click on “OK.”

Discover {that a} line area now separates the picture from the textual content that follows.

You could be questioning why you can’t just press Enter firstly of the paragraph beneath the desk to create the additional area. The explanation to keep away from that is that by urgent Enter, you are creating an empty paragraph marker, which may have an effect on your doc’s structural integrity down the road.
Wrap Textual content Across the Image
The following alteration I wish to make to my picture is to alter the way it behaves throughout the textual content. Particularly, I need the image to be round half the width of the textual content paragraphs, and the textual content to wrap round it. If you wish to do the identical, choose the picture and use a nook deal with to shrink it to the specified dimension whereas sustaining its proportions.

Subsequent, click on and drag the sting of the desk in order that it neatly surrounds the picture’s new dimension.

Now, it is advisable regulate the desk’s text-wrapping properties. To do that, hover over the desk and, this time, right-click the crosshairs button within the top-left nook. Then, choose “Desk Properties.”

Within the Desk tab of the Desk Properties dialog field, choose “Round” within the Textual content Wrapping choices, and click on “OK.”

Now, the textual content is neatly wrapped across the picture, and since the image is encased in a desk, there’s an enough hole between the proper fringe of the image and the textual content sitting subsequent to it. You may additionally make this hole bigger or smaller by merely readjusting the positioning of the proper fringe of the desk cell.

Transfer and Align the Image
As soon as your picture is the proper dimension, you’ll be able to merely click on and drag the crosshairs icon within the top-left nook of the desk to reposition it to wherever works finest for you. Sure, you are able to do this with pictures that aren’t contained inside tables, too, however getting the exact place is way more easy utilizing this technique.
Within the instance beneath, I’ve moved the desk to the proper of my web page, and right-aligned the image within the Desk Format tab on the ribbon in order that it aligns extra carefully with the proper fringe of the justified textual content.

Add a Caption to the Image
Subsequent, as an example you needed so as to add a caption beneath an image in your Phrase doc. As soon as once more, that is the place utilizing a desk can save the day.
Sure, you’ll be able to right-click a picture and choose “Insert Caption,” however in my expertise as an instructional proofreader and authorized doc producer, this technique leads to grave inconsistencies and awkward formatting points.
As an alternative, together with your picture already added to a single-cell desk, within the Desk Format tab, click on “Insert Row Under.”

Now, within the new row you simply added, sort the caption.

There are two extra steps I like to recommend you are taking at this stage.
First, you wish to make sure that the 2 cells of the desk (the higher cell containing the picture and the decrease cell containing the caption) keep collectively. In different phrases, in case you do not make the next changes, the caption cell may transfer to the subsequent web page, with the picture cell staying on the earlier one. To forestall this from taking place, choose the image, and within the House tab on the ribbon, click on the “Paragraph Settings” dialog field launcher icon.
Now, open the “Traces And Web page Breaks” tab of the Paragraph dialog field, test “Hold With Subsequent,” and click on “OK.” Which means the picture you chose is successfully glued to the textual content within the row beneath, in order that they’ll by no means be cut up up by a pure web page break in your doc.

If you’d like the picture and its caption to stick with the paragraph beneath the desk, apply the Hold With Subsequent setting to the caption, too.
The ultimate step you need to take is to alter the caption’s type. Together with your cursor anyplace within the caption’s textual content, press Ctrl+Shift+S to launch the Apply Kinds dialog field, and within the Fashion Title area, sort the primary few letters of the phrase “Caption.”


Associated
As soon as the phrase “Caption” is autocompleted, click on “Modify.”
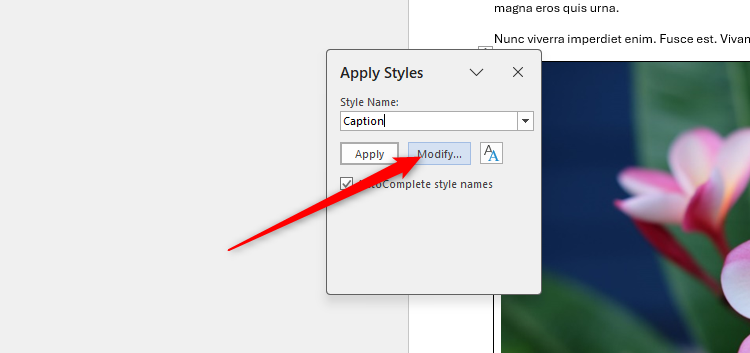
Subsequent, change the font formatting so the caption is offered in another way out of your regular type. Personally, I like my captions to be italicized and darkish blue with middle alignment. Additionally, click on “Format” within the bottom-left nook of the Modify Fashion dialog field to regulate different settings, like ensuring there is a area after the caption textual content.

Whenever you’re executed, click on “OK” to see this new type utilized to the caption you typed earlier.

Now you can apply this type formatting to another captions you add to pictures in tables in the remainder of your doc.
In the event you add a table of figures to your doc by clicking References > Insert Desk Of Figures, click on “Choices,” test “Fashion,” and guarantee “Caption” is chosen. Which means when Phrase generates your desk of figures, it’s going to choose up any textual content on this type.
Insert a Gallery of Footage
In the event you’re not but satisfied that utilizing tables is the easiest way to arrange your photos in Microsoft Phrase, I problem you to insert pictures subsequent to one another with out them behaving erratically! It is tough, proper? After all, the reply to this downside is to make use of a desk!
To illustrate you needed a gallery of six photographs throughout two rows. First, add your 3×2 desk by way of the Desk drop-down menu within the Insert tab on the ribbon. If you wish to add captions below every picture utilizing the tactic I outlined above, choose 4 rows as a substitute of two.

Then, as soon as you’ve got adjusted the Spacing After, and made another formatting and behavioral adjustments to your desk, merely insert your photos into every cell. The hot button is to verify every picture is encased in a separate cell, as a way to make adjustments to its dimension, form, and formatting with out affecting any of the opposite photos you added.
Use Microsoft Word’s Crop tool within the Image Format tab on the ribbon to resize the photographs to the identical side ratio and, thus, obtain consistency.

Take away the Borders
The ultimate step to creating your pictures look the half is to remove the borders from the table. Click on the crosshairs button to pick out the entire desk, and within the Desk Design tab on the ribbon, click on Borders > No Border.

Now, take a second to understand how the photographs will look once you print the doc.

To see the desk’s borders in your display with out them being seen once you print the doc, choose the desk, and click on “View Gridlines” within the Desk Format tab on the ribbon.
Having numerous pictures in a doc can considerably improve the dimensions of the file and, thus, decelerate its efficiency. To resolve this, you’ll be able to compress pictures in Microsoft Word to scale back the area they take up.